People travel from all over the world to see the wide variety of wildlife throughout Colorado.
The most popular national park in Colorado – Rocky Mountain National Park – offers a wide breadth of wildlife to photograph in ecosystems that stretch from meadows at lower elevations to tundra and mountain peaks in higher parts of the park.
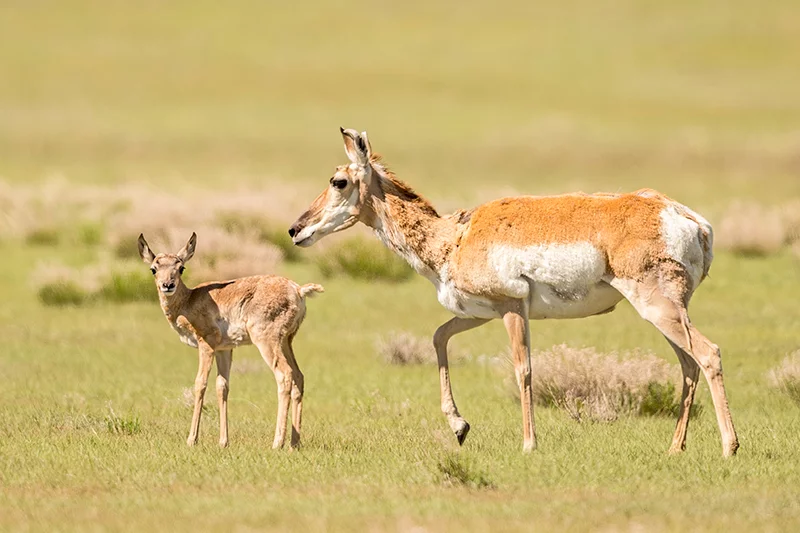
In the lower montane zone at 8,000 to 9,500 feet, herds of elk, families of mule deer, solitary moose and bachelor herds of bighorn sheep – the state’s official mammal – enjoy the verdant green grassy meadows in early summer.

Climbing in elevation along a backcountry trail or the more easily accessible paved roads of the park may give wildlife enthusiasts the opportunity to see the animals that enjoy the subalpine zone, which ranges from 9,500 to 11,500 feet. Here, lone bull elk may quietly pass through the thick forest of lodgepole and limber pine trees while snowshoe hares hop along the duff of the forest floor.
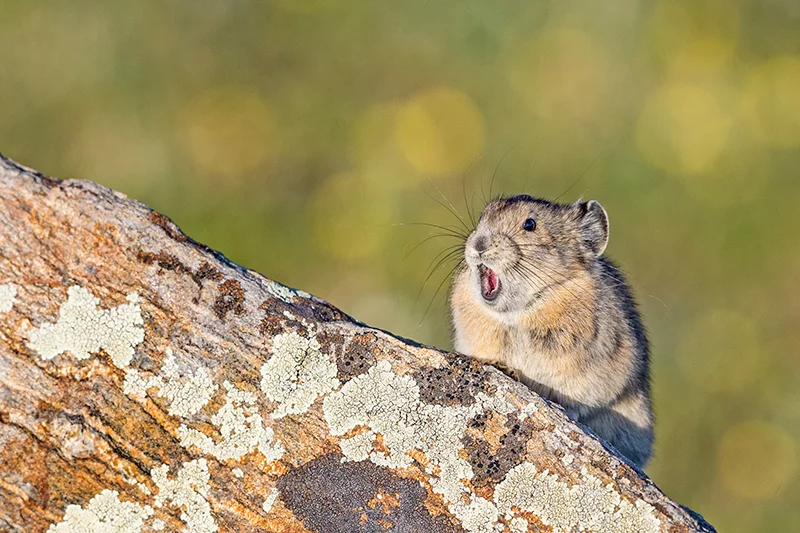
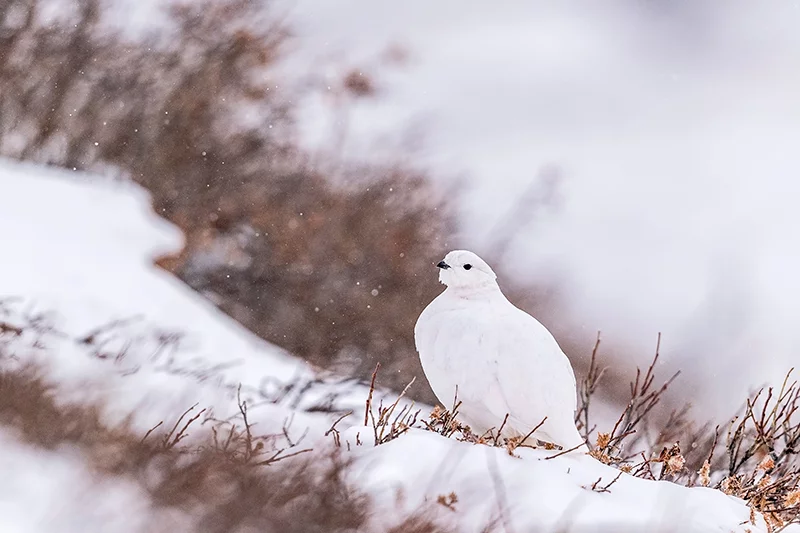
The highest zone – the alpine zone – is what Rocky Mountain National Park was established to protect and covers about one-third of the park. In this harsh landscape above 11,500 feet that lacks trees but is abundant in wind, cold temperatures and minimal rainfall, wildlife like the adorable American pika, white-tailed ptarmigan and yellow-bellied marmot thrive.
Beyond the state’s jewel of the National Park Service, Colorado offers all sorts of remarkable creatures to photograph in the 22 million acres of public land across the state.
For example, the colorful collared lizard scurries across the deserts of southwestern Colorado. In the vast expanse of tundra at the highest elevation across the state, a well-camouflaged long-tailed weasel hunts in the talus slopes for prey twice its size. The pronghorn antelope, North America’s fastest land mammal, dashes across the grassy plains of eastern Colorado. And charismatic moose – thrive in the wetlands throughout the state.
With 473 bird species, 130 mammal species, 49 reptile species, 69 fish species and 18 amphibian species, Colorado has no shortage of diverse animals to witness and photograph.
But where do you begin the process of capturing a wall-worthy photograph of the species that most captivates you?
Tips to get you started with photographing wildlife
These five tips will get you started with photographing Colorado’s wide variety of avian and terrestrial wildlife.
Know your subject
The first step in any successful photograph begins before even picking up a camera. Become familiar with the species you would like to photograph.
Research some of the following information before you head out to photograph wildlife that entrance you.
- What season does their fur, feathers or hair look best?
- Are they most active during dawn and dusk or during the middle of the day?
- What do they like to eat, and where do they feed?
- What areas do they migrate to and at what times of year?
The more you know about a species, the more you can anticipate their behavior and be in the right place at the right time. Then you’ll be able to prepare the photo settings on your camera and capture the best images of the animal.
Learn the triangle of light
The term “photography” means “the study of light.” Sometimes referred to as the “exposure triangle,” this simple concept is the foundation for all things related to photography.
The triangle helps photographers understand how to create a proper exposure with three ways to manipulate light in camera: shutter speed, ISO and aperture.
Shutter speed is how long the shutter stays open. It works like opening and closing a window. The slower you open it, the more light you let in. But the more you open the window, the more time your subject has to cross the sensor.
Fast shutter speeds, such as 1/2000 of a second, will freeze action, but less light will reach the sensor, making an image underexposed. Slower shutter speeds, like 1/50 of a second, will allow more light into the camera but will create motion blur either from holding the camera or a moving subject.
ISO is the term used to refer to how sensitive the camera sensor is to light. A higher ISO brightens the image, but the tradeoff is more digital noise, often called “grain,” which most photographers want to avoid.
Basically, the ISO helps the photographer properly expose for the light conditions, using a low ISO in bright light and high ISO in darker scenes.
Aperture, or the f-stop, refers to how wide the opening is in a lens. The wider the aperture, such as f2.8 or f3.2, the more light that enters the camera. With a smaller aperture, like f16 or f22, less light reaches the sensor.
Understanding aperture goes hand in hand with understanding depth of field. Depth of field is the amount of a scene that is focus.
Using a wide aperture, such as f4, will produce a shallow depth of field. This is ideal for creating a soft background – called bokeh – behind an animal subject in portrait images.
Changing to a smaller aperture, such as f16, will produce a deep depth of field and put everything throughout the scene into sharper focus. Using this technique is ideal for wildlife-in-the-landscape photographs, referred to as environmental portraits, or wide, scenic images.
Using these three methods to adjust light in the photograph gives photographers creative leverage while making sure the image is correctly exposed. A proper exposure is reached by adding light from one method and then adjusting another to achieve the desired visual effect with the correct amount of light for the scene.
For example, to photograph a bird in flight, first adjust the shutter to at least 1/1000 second to stop the movement. Then, based on the amount of light in the scene, adjust the aperture so the exposure is bright but not overexposed. Finally, if more or less light is needed to ensure proper exposure, adjust the ISO as needed.
Another example might be a portrait of a bighorn sheep. In this case, the aperture becomes the first step in adjusting the exposure triangle, selecting a wide aperture, such as f6.3, to create a soft background while capturing enough depth of field for the nose, eyes and at least part of the horns to be in focus. Then adjust the shutter to be fast enough to ensure the subject is sharp while giving the scene enough light. And then use the ISO to finalize the exposure as needed.
Photograph in ideal light
The best light for wildlife photographs happens in the early morning and late afternoon. Photographers often refer to these times as the “golden hour.” You’ll see this fleeting, transcendent light about an hour after sunrise and an hour before sunset, when the sun sits low in the sky and casts a golden light across the scene.
As the sun rises higher in the sky throughout the day, shadows become harsh and the light in the scene will be full of sharp contrasts, creating deep shadows and bright highlights.
When starting out with wildlife photography, work with the sun behind you to illuminate the subject.
As you become more comfortable adjusting to different lighting conditions, you can progress into creating more dramatic images.
For example, backlighting is a term photographers use when the light source comes from behind the subject and thus comes directly towards the camera. These scenarios create rim lighting around an animal, along with silhouetted subjects and illuminated breath.
Another type of alternate lighting condition is side lighting. In this case, only half of the subject is lit by the light source, with the light coming in from the left or right. This, too, creates a dramatic effect as the light can be directed toward certain features of the subject.
Study composition techniques
Composition is the arrangement of elements within the photograph. Using compositional elements helps direct the viewer’s eye to the story the photograph depicts to create a balanced and dynamic image. Some of these elements include leading lines, subjects, backgrounds, shapes, colors and texture.
The rule of thirds, where the frame is divided into an imaginary tic-tac-toe grid, is the simplest way to compose a photograph. By placing the animal, such as a moose, at one of the four cross points and having that subject look into the frame, the viewer will be more drawn into the scene.
If you’re photographing a subject like a bald eagle, have the bird facing into the frame, with minimal space behind the subject, and use implied lines within the scene to create tension and drama. For example, wait for the bald eagle to have their wings up or down rather than straight out to have movement and implied direction.
The foreground, midground and background are also important elements. Avoid having distracting objects in the foreground and background as the animal fills the midground of the frame.
Practice patience
No other area of photography takes as much patience as wildlife photography. Subjects do not listen to the instructions of the photographer. Leave No Trace guidelines and ethical principles of nature photography dictate that the animal should always be priority over stressing them for the sake of a photograph.
To do that, photographers must spend time finding, waiting and watching their subjects as they look for the right moments to take a photo. Studio photographers, like portrait or commercial photographers, can control their scene. Wildlife photographers, on the other hand, search for the ideal scene, often waiting hours, days and even years for just the right behavior, action and lighting conditions.
When photographing wildlife, keeping the compositional guidelines in mind will help create a stunning photo of the animal. Try these strategies:
- Put your animal in one of the four cross points of a tic-tac-toe grid.
- Have the subject facing into the frame or directly towards the camera.
- Place the subject so there is minimal space behind them, being cognizant of the dynamic space in front of the animal to lead into the scene.
- Stay aware of any distracting objects in the background, such as bright areas or trees rising out of heads, and adjust the composition as needed.
- Always ensure the eyes are tack sharp by placing the focal point on the closest eye to the camera.
Remember, the photographer takes the photo using the camera as the tool. You don’t have to buy the most expensive gear to capture a stunning image. Know your subject, be familiar with how to adjust the settings on your camera and make sure to enjoy the view beyond the viewfinder too.